Krissy & Sarah’s Recipe Exchange

Our Favorite Recipes

Blueberry Lemon Coffee Cake October 30, 2009

Filed under: breakfast,Coffee Cake/Bread — Kristen @ 12:18 pm
Tags: , , , ,

Bluuuuuuueberry Coffee Cake

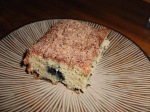
This coffee cake was great, and easy to make too, which is a bonus in my book.
But next time I make it, the things that I would change, from the original recipe below are:

  • I’d add more blueberries to the cake (maybe another 1/3 Cup)
  • I’d add at least one more Tbsp. of butter to the streusel topping
  • More lemon zest (probably the entire lemon) because it was very difficult to detect

**To make the coffeecake even faster to prepare in the morning, prepare the streusel and measure out the dry ingredients for the cake the night before.

INGREDIENTS

Topping
1/3 cup packed light brown sugar
1/3 cup granulated sugar
1 tablespoon ground cinnamon
1 tablespoon unsalted butter , melted and cooled
1 cup pecans , almonds, or walnuts, chopped coarse
Cake
3 cups all-purpose flour
1 tablespoon baking powder
1 teaspoon baking soda
1 teaspoon ground cinnamon
1/4 teaspoon table salt
1 3/4 cups buttermilk or plain yogurt
1 cup packed light brown sugar
1 cup granulated sugar (7 ounces)
3 large eggs
7 tablespoons unsalted butter , melted and cooled
1 cup blueberries (fresh or frozen), rinsed and dried
1 teaspoon grated lemon zest

INSTRUCTIONS

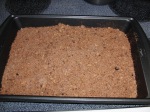
  1. For the topping: Mix the brown sugar, granulated sugar, cinnamon, and melted butter together in a medium bowl until the mixture resembles wet sand.
  2. Stir in the nuts.
  3. Adjust an oven rack to the middle position and heat the oven to 350 degrees.
  4. Generously coat a 9 by 13-inch baking pan with vegetable oil spray.
  5. For the cake: Mix the flour, baking powder, baking soda, cinnamon, and salt together in a large bowl.
  6. Whisk the buttermilk (Note: I used vanilla yogurt), brown sugar, granulated sugar, eggs, and melted butter together in a separate bowl until smooth.
  7. Gently fold the egg mixture into the flour mixture with a rubber spatula and stir until the batter looks smooth and well combined.
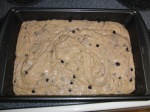
  8. Stir in blueberries and lemon zest.
  9. Scrape the batter into the prepared pan and smooth the top.
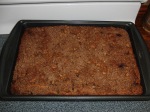
  10. Sprinkle the topping evenly over the batter.
  11. Bake until the top is golden and a toothpick inserted into the center comes out with just a few crumbs attached, 40 to 45 minutes.
  12. Let the cake cool on a wire rack for 15 minutes before serving.
 

Best Blueberry Muffins w/Frozen Blueberries October 25, 2009

Filed under: breakfast,Muffins — Kristen @ 5:18 am
Tags: , , ,
Doesn't that look yummy?

Doesn't that look yummy?

I will never make another blueberry muffin after finding this recipe.  Hands down, it’s the best homemade muffin I’ve ever made.  I think it’s the lemon zest and the blueberry topping that make them taste so good.

Note: If buttermilk is unavailable, substitute 3/4 cup plain whole-milk or low-fat yogurt thinned with 1/4 cup milk. Our favorite brands of frozen blueberries are Wyman’s and Cascadian Farm.

INGREDIENTS

Lemon-Sugar Topping
1/3 cup sugar (2 1/3 ounces)
1 1/2 teaspoons finely grated zest from 1 lemon
Muffins
2 cups frozen blueberries
1 1/8 cups sugar (8 ounces) plus 1 teaspoon
2 1/2 cups unbleached all-purpose flour (12 1/2 ounces)
2 1/2 teaspoons baking powder
1 teaspoon table salt
2 large eggs
4 tablespoons unsalted butter , melted and cooled slightly (1/2 stick)
1/4 cup vegetable oil
1 cup buttermilk (see note)
1 1/2 teaspoons vanilla extract

INSTRUCTIONS

  • FOR THE TOPPING: Stir together sugar and lemon zest in small bowl until combined; set aside.
  • FOR THE MUFFINS: Adjust oven rack to upper-middle position and heat oven to 425 degrees. Spray standard muffin tin with nonstick cooking spray. Bring 1 cup blueberries and 1 teaspoon sugar to simmer in small saucepan over medium heat. Cook, mashing berries with spoon several times and stirring frequently, until berries have broken down and mixture is thickened and reduced to ¼ cup, about 6 minutes. Transfer to small bowl and cool to room temperature, 10 to 15 minutes.
  • Rinse remaining cup berries under cold water and dry well.
  • Whisk flour, baking powder, and salt together in large bowl.
  • Whisk remaining 1 1/8 cups sugar and eggs together in medium bowl until thick and homogeneous, about 45 seconds. Slowly whisk in butter and oil until combined. Whisk in buttermilk and vanilla until combined.
  • Toss dried blueberries in flour mixture. Then, using rubber spatula, fold egg mixture into blueberries and flour mixture until just moistened. (Batter will be very lumpy with few spots of dry flour; do not overmix.)
  • Use ice cream scoop or large spoon to divide batter equally among prepared muffin cups (batter should completely fill cups and mound slightly). Spoon teaspoon of cooked berry mixture into center of each mound of batter. Using chopstick or skewer, gently swirl berry filling into batter using figure-eight motion.
  • Sprinkle lemon sugar evenly over muffins.
  • Bake until muffin tops are golden and just firm, 17-19 minutes, rotating muffin tin from front to back halfway through baking time.
  • Cool muffins in muffin tin for 5 minutes, then transfer to wire rack and cool 5 minutes before serving.


Stacked Burrito Pie October 24, 2009

Filed under: Beef,casserole,Mexican — Kristen @ 1:30 pm
Tags: , , , ,
Burrito Pie

Burrito Pie

Okay, so maybe this doesn’t look as good in my photo as it did in the magazine, but boy was it yummy.  I came across this recipe in the May 2009 issue of Family Fun magazine (Yes, I’m that far behind in my magazines!).  It looked really easy to make, and totally like something my family would love.  The only problem was that it called for using a 9″ springform pan.  I’ve toyed with buying a springform pan several times over the years for various recipes but I never actually went through with it.  Until now, that is.  First I asked all my girlfriends and none of them had one I could borrow.  So off I shuffled to Walmart.  I bought the only one they had on the shelf, a 9″ springform pan from NordicWare.  I think it cost around $10.  And I’m glad I bought it because I’ll probably be making this recipe at least a couple of times per month, for sure.

Ingredients:

2 Tbsp vegetable oil
1 Medium onion, finely chopped
2 cloves garlic, minced
3/4 lb. lean ground beef (*I used ground chuck)
2 tsp chili powder
1 tsp cumin
1/2 tsp salt
3/4 Cup water
1 (15 oz) can black beans, drained and rinsed (*I left out approximately 2 tbsp of the beans because it looked like a LOT of beans to me)
1-1/2 Cups frozen corn kernels
4 (10″) flour tortillas
1/2 Cup sour cream
1 Cup salsa
8 oz. Cheddar or Monterey Jack, grated (*I used a bag of Mexican mix shredded cheese since I always have that on hand)

  1. In a large skilled over med-low heat, warm the oil.  Add the onion and saute for 5 minutes, stirring often.  Add the garlic and saute another minute.
  2. Increase the heat to medium, then add the ground beef, chili powder, and cumin.  Cook the mixture until the beef is browned and no longer pink, stirring often, about 3 minutes. Add teh salt, water, black beans, and corn, and bring the mixture to a boil.  Allow it to continue boiling, stirring occasionally, until the liquid evaporates, about 20 minutes.  Remove the mixture from the heat and let it cool for 10 minutes.
  3. Heat the oven to 350.  Using the rim of a 9″ springform pan as a template, trim the tortillas to the size of the pan.
  4. Butter the bottom and sides of the pan (*I used butter flavored Crisco spray because using butter seemed like a lot of work).
    Press one of the tortillas into the bottom of the pan.
    Spread 2 Tbsp of sour cream over the tortilla, followed by 1/4 Cup of the salsa.
    Spoon and spread a quarter of the beef mixture over the salsa, then sprinkle a quarter of the cheese evenly over the top.
  5. Repeat these steps until the ingredients and tortillas are used up.  You should end up with 4 layers, topped with the final sprinkling of cheese.
  6. Bake the pie until heated through, about 30 minutes.  Allow it to cool for 10 minutes, then remove the rim from the springform pan (*I removed the entire pan and slide the pie onto a cutting board to slice).  Slice into wedges, like a cake.
 

Pineapple-Brown Sugar Glazed Chicken Breasts July 20, 2009

Filed under: Chicken — Kristen @ 7:47 pm
Tags: , , ,
With the glaze

With the glaze

This was de-licious!  It took me a while to make, but I swear half the problem was having to keep looking back at the recipe book while I was searching out ingredients.  I’d look at the ingredient list, go in search of the item I needed, and then promptly forget what I was looking for and have to go back and look again.  I think I may have been having a senior moment of some sort.

The house smelled absolutely fantastic too.  Even my 11 yr. old stepson raved about it (the smell AND the taste).  And 11 year olds don’t eat anything that actually tastes good!  I took that as a good sign.  My husband claimed that it looked like a “fancy restaurant dish.”  I’d definitely make this again.  Especially if I was trying to impress someone.

Ingredients:

1-1/2 Cups Pineapple Juice, plus 2 Tbsp.
1/3 Cup Light Corn Syrup
2 Tbsp. Brown Sugar
1 Tbsp. Dijon Mustard
1 Tbsp. Distilled White Vinegar
1/8 tsp. Red Pepper Flakes
1/8 tsp. Salt
1/8 tsp. Pepper
1/2 Cup Unbleached All-Purpose Flour
4 bone-in, skin-on split Chicken Breasts, trimmed (trim ribs off)
2 Tbsp. Vegetable Oil
1 Medium Shallot, Minced (3 Tbsp.)

  1. Adjust an oven rack to the middle position and heat the oven to 350. Whisk 1-1/2 Cups of the pineapple juice, the corn syrup, brown sugar, mustard, vinegar, red pepper flakes, salt and pepper together in a medium bowl.  Set aside
  2. Place the flour in a shallow dish (or pie plate).  Pat the chicken dry with paper towels and season with salt and pepper.  Working with 1 chicken breast at a time, dredge in the flour, shake off the excess.
  3. Heat the oil in a 12″ ovensafe skillet over medium-high heat until just smoking.  Carefully lay the chicken breasts skin side down, in the skillet, and cook until well browned, 6-8 minutes.  Flip the chicken and continue to brown lightly on the second side, about 3 minutes.  Transfer the chicken to a plate.
  4. Pour off all but 1 tsp. of the fat in the pan, add the shallot, and cook over medium-high heat until softened, about 2 minutes.  Increase the heat to high, add the juice mixture, and simmer, stirring occasionally, until syrupy and measures about 1 Cup, 6-10 minutes.
  5. Remove the skillet from the heat and tilt it to one side so that the glaze pools in the corner of the pan.  Using tongs, roll each chicken breast in the pooled glaze to coat, then lay in the skillet, skin side down.
  6. Transfer the skillet to the oven and bake the glazed chicken until the thickest part of the breasts registers 160-165 degrees, approximately 25-30 minutes, flipping the chicken over, halfway through cooking.
  7. Using a potholder, remove skillet from the oven.  Transfer the chicken to a platter and let rest for 5 minutes.  Meanwhile, return glaze to high heat and simmer, stirring constantly, until thick and syrupy, about 1 minute (Note: It took me closer to 3 minutes).
  8. Off the heat, whisk in the remaining 2 Tbsp. of juice and spoon glaze evenly over the chicken.  Serve chicken with extra glaze on the side.
 

Skillet Lasagna March 23, 2009

Filed under: Beef,Italian,Pasta — Kristen @ 6:36 pm
Tags: , , , ,
Skillet Lasagna

Skillet Lasagna

This was yummy, and a nice twist on regular lasagna. 
It actually seemed a bit easier too, although, when I look back at the steps involved, maybe it was really about the same.  Either way I’d do this again in a heatbeat.  I think the only thing I’d change about it would be to add more Ricotta next time.

Ingredients:

1-28oz can diced tomatoes
Water
1 Tbsp olive oil
1 medium onion, minced
salt
3 medium garlic cloves, minced or pressed through a garlic press (about 1 tbsp.)
1/8 tsp red pepper flakes
1 lb. meatloaf mix (Note: I used ground chuck instead of meatloaf mix)
10 curly-edged lasagna noodles, broken into 2″ lengths
1-8oz can tomato sauce
1/2 Cup plus 2 tbsp. grated Parmesan cheese
Ground black pepper
1 Cup ricotta cheese
3 Tbsp chopped fresh basil leaves (Note: I used frozen, warmed up to room temperature)

  1. Pour the tomatoes with their juices into a 1-qt liquid measuring cup.
  2. Add water until the mixture measures 1 quart.
  3. Heat the oil in large nonstick skillet over medium heat until shimmering.
  4. Add the onion and 1/2 tsp salt and cook until the onion begins to brown, about 5 minutes.
  5. Stir in the garlic and pepper flakes and cook until fragrant, about 30 seconds.
  6. Add the ground meat and cook, breaking apart the meat, until no longer pink, about 4 minutes.
  7. Scatter the pasta over the meat but do not stir. 
  8. Pour the diced tomatoes (and juices) and tomato sauce over the pasta.
  9. Cover and bring to a simmer.
  10. Reduce the heat to medium-low and simmer, stirring occasionally, until the pasta is tender, about 20 minutes.
  11. Remove the skillet from the heat and stir in the 1/2 Cup Parmesan cheese.
  12. Season with salt and pepper.
  13. Dot with heaping tablespoons of the ricotta, cover, and let stand off the heat for 5 minutes.
  14. Sprinkle with the basil and the remaining 2 Tbsp of Parmesan.
  15. Serve.
 

Whoopie Pies March 22, 2009

Filed under: Dessert — Kristen @ 9:40 pm
Tags: , , ,


Chocolately Goodness

Chocolatey Goodness

Oh my god! That’s all I can say about this chocolately goodness. They brought back memories of childhood and the whoopie pies that my mom used to make.  And dare I say it…they were almost better the 2nd day!

This recipe actually says it makes 6, but the next time I make them I’m definitely spreading the batter a bit thinner and making more.  They were WAY too big to eat.  We all ended up eating only half and then saving the other halves for later.  I think we would’ve all ended up in sugar comas had we attempted to finish an entire whoopie pie.

Cake Ingredients:

2 Cups all-purpose flour
1/2 Cup Dutch processed cocoa powder (Note: I used regular Hershey’s cocoa powder, not Dutch processed)
1 tsp. baking soda
1/2 tsp. salt
8 Tbsp. (1 stick) unsalted butter, softened
1 Cup packed light brown sugar
1 large egg, room temperature
1 tsp. vanilla extract
1 Cup buttermilk

Filling Ingredients:

12 Tbsp (1-1/2 sticks) unsalted butter, softened
1-1/4 Cups confectioners’ sugar
1-1/2 tsp vanilla extract
1/8 tsp salt
2-1/2 Cups marshmallow fluff

  1. For The Cakes:  Adjust two oven racks to the upper-middle and lower-middle positions and hat the oven to 350.
  2. Line 2 baking sheets with parchment paper.
  3. Whisk the flour, cocoa, baking soda and salt in a medium bowl.
  4. With an electric mixer at medium speed, beat the butter and brown sugar until fluffy, about 2 minutes.
  5. Beat in the egg until incorporated, then beat in the vanilla.
  6. Reduce speed to low and add the flour mixture and the buttermilk alternately, in 2 batches.
  7. Using a 1/3 Cup measure, scoop 6 mounds of batter onto each baking sheet, spacing the mounds about 3 inches apart.
  8. Bake until the cakes spring back when pressed, 15-18 minutes, switching and rotating the baking sheets halfway through baking.
  9. Cool the cakes completely on the baking sheets, at least 1 hour.


  1. For the Filling:  With an electric mixer at medium speed, beat the butter and confectioners’ sugar together until fluffy, about 2 minutes.
  2. Beat in the vanilla and salt.
  3. Beat in the Fluff until incorporated.
  4. Refrigerate the filling until slightly firm, about 30 minutes.  (The filling can be refrigerated for up to 2 days)
  5. Dollop 1/3 Cup of the filling on the center of the flat side of six of the cakes.
  6. Top with the flat side of the remaining six cakes and gently press until the filling spreads to the edge of the cake.
  7. Serve.

Note:  Whoopie pies can be refrigerated in an airtight container for up to 3 days.


Bops

Filed under: breakfast — Kristen @ 9:21 pm
Tags: , ,
Bops w/maple syrup

Bops w/maple syrup

Ok, what can I say about Bops? The cookbook described them as a cross between crepes and pancakes, and it turned out to be very accurate. And they almost had the chewy consistency of popovers too, believe it or not.  Absolutely delicious.  My little guy (who’s VERY picky these days) flipped over these!  Maybe it was all the drippy butter, or the maple syrup…but I like to think that it’s just my amazing cooking.  Either way, they were great.  They were a little too decadent for every week, but they’d be perfect for a special treat every once in a while.

Ingredients:

3 large eggs
1 Cup all-purpose flour
2 Cups milk
1 Tbsp vegetable oil
1/2 tsp. salt
3 Tbsp unsalted butter, softened (Note: I found this to be too much.  I used 2 Tbsp and it still seemed like a lot)

  1. Adjust oven racks to the upper-middle and lower-middle positions and heat oven to 375.
  2. Grease 3, 9″ pie plates.
  3. With an electric mixer on high speed, beat the eggs in a large bowl until pale and thick, about 2 minutes. (Note: I hauled out my stand mixer for this but afterwards wish I’d stuck with my little hand mixer….the batter didn’t seem big enough to warrant the large aparatus)
  4. Add the flour and mix on the lowest speed until just combined.
  5. Add the milk, oil and salt and mix until incorporated (the batter will be thin).
  6. Add 1 Cup of batter to each of the prepared pie plates and bake, switching the plate positions halfway through the baking time, until puffed and browned, about 25 minutes. (Note: Mine were closer to 30 minutes)
  7. Cool the pancakes until just warm (they will collapse when cool).  Place one pancake on a serving plate and spread with softened butter.  Stack the 2nd pancake on top of the 1st, add the butter, and repeat with the 3rd pancake.
  8. Cut into wedges.  Serve with maple syrup or honey.
 

Zesty Italian Chicken March 14, 2009

Filed under: Chicken,Italian — sarah @ 9:14 pm
Zesty Italian Chicken

Zesty Italian Chicken

This is a delicious recipe and so simple to create.  The chicken is tender and flavorful so much so that I almost had seconds…mmmm


Ingredients:
2 Cups Italian style bread crumbs
2 eggs (for 4 chicken breasts)
1/4 Cup milk
4 thin sliced chicken breasts
2 – 15 oz cans petite diced tomatoes (drained)
2 green peppers (diced small)
1 small onion (diced small)
1/2 cup spaghetti sauce (thick)
1/8 cup grated parmesan cheese
1 TBSP red pepper flakes
2 TBSP oregano
1 TBSP basil
1 cup mozzarella  cheese
2 TBSP chopped garlic

Directions:
Beat eggs and milk together.  Dredge chicken breasts in mixture then coat with bread crumbs.  In a large skillet on medium/medium high heat, heat olive oil and garlic then add chicken into pan and cook for 1-2 minutes.  Turn chicken and cook an additional 1-2 minutes.  Place in a
8 1/2 X 11 baking dish. 

Place peppers, onion, and tomatoes in the original skillet and bring to simmer.  Add spaghetti sauce, oregano, basil, red pepper, and parmesan cheese then simmer for 5-10 minutes.  

Pour skillet contents over chicken (in baking dish).  Sprinkle with mozzarella cheese and bake at 375 degrees for 30 minutes.  Serve with vegetable or salad.


Restaurant-Style Hummus March 12, 2009

Filed under: Appetizer,Vegetable — Kristen @ 12:52 pm
Tags: , , ,

I’ve tried making hummus in the past – several times in fact, but all the recipes were terrible.  The hummus turned out either too bland, too grainy, or just plain gross.  So I was a little skeptical about trying this recipe.  But now that I’ve made it, I’m never buying store-bought hummus again.  I could’ve eaten almost the whole entire batch in one sitting, that’s how good it is/was.

Ingredients:

3 Tbsp fresh lemon juice (Note: This was 1 average sized lemon)
1/4 Cup water
6 Tbsp tahini, stirred well
2 Tbsp extra-virgin olive oil, plus extra for drizzling (if you like it that way)
1 (14 oz) can chickpeas, drained and rinsed
1 garlic clove, minced
1/2 tsp salt
1/4 tsp ground cumin
pinch of cayenne pepper
1 Tbsp minced fresh cilantro or parley (for garnish)

  1. Combine the lemon juice and water in a small bowl or measuring cup.
  2. Whisk together the tahini and 2 Tbsp of the oil in a 2nd small bowl or measuring cup. 
  3. Process the chickpeas, garlic, salt, cumin and cayenne in a food processor until almost fully ground, about 15 seconds (Note: it took me a little bit longer than 15 seconds).
  4. Scrape down the bowl with a rubber spatula.  With the machine running, add the lemon juice-water mixture in a steady stream through the feed tube.  Scrape down the bowl and continue to process for 1 minute.
  5. With the machine running, add the oil-tahini mixture in a steady stream through the feed tube; continue to process until the hummus is smooth and creamy, about 15 seconds, scraping down the bowl as needed.
  6. Transfer the hummus to a serving bowl, sprinkle with cilantro or parsley, cover with plastic wrap (or lid), and chill at least 30 minutes.  Drizzle with oil oil, serve at room temperature or cold.

SO much less expensive than store bought hummus, quick and easy to make, and healthy too!  I dove into this hummus so quickly after I finished making it that I forgot to take a pic!  Oops.


Broiled Haddock/Cod March 8, 2009

Filed under: Seafood — Kristen @ 8:23 am
Tags: , ,


Broiled Cod

Broiled Cod

I found this recipe online one day, when I was searching for a way to cook some fresh haddock that I had just bought at Whole Foods.  I ended up using another recipe but I hung on to this one because it seemed easy, and it looked like something that both my husband and I would like.

It didn’t come out quite as pretty as I would’ve liked.  I think I took the word “browned” to a whole new level.  But hey, at least it still tasted good.

Ingredients:
1-1/2 lbs haddock filets (Note: I substituted for cod since they didn’t have haddock)
1 tsp salt
1/8 tsp pepper
3/4 Cup soft fresh bread cubes (Note: I used the asiago cheese bread that I had on hand)
3 Tbsp butter, melted (Note: I think I used closer to 5 Tbsp by the time I was done)
1/4 tsp dried thyme, crumbled
Lemon wedges & chopped parsley for garnish (Note: I didn’t use either of these)

  1. Sprinkle both sides of the haddock/cod with salt and pepper.
  2. Place in a shallow baking dish or on a buttered broiler rack.
  3. Toss bread cubes with 2 Tbsp of the butter and the dried thyme. (Note: It took me closer to 4 Tbsp to adequately coat all the bread)
  4. Sprinkle coated bread over the fish then drizzle with remaining butter.
  5. Place under the broiler at 400 degrees, and broil for 25 minutes, or until fish is flaky and topping is browned.
  6. Serve with lemon wedges and sprinkle with parsley.